![]()
개요
기존 포스팅에서 카메라 활용 예제, Barracuda 설치 예제까지 다뤄보았다. Pytorch 에서 학습된 YOLOv8 모델에 대해서 .onnx 추론을 돌려본 경험까지 정리해보려고 한다.
pt to onnx
앞선 포스팅에서 포스팅 마지막에 Pytorch 모델을 ONNX 모델로 변환하여 에셋에 추가하는 부분을 언급했는데, 이때 놓친부분이 변환 시 opset version을 최신버전으로 하면 유니티의 Barracuda 가 인식을 못하는 문제가 있었다. stackoverflow, github issue 등 비슷한 문제를 검색하다보니 변환 시에 opest 버전을 낮게하니까 되더라는 답변이 있어 opset version을 9로 지정하여 넣었더니 정상적으로 모델이 인식되었다. 이에 대해 왜그런것인가 GPT에게 문의하니 답변은 다음과 같았다.
- Barracuda의 연산자 지원범위
- Barracuda는 특정 opset 버전에서 사용되는 연산자들을 완벽하게 지원합니다. 최신 opset 버전의 경우, Barracuda가 아직 지원하지 않는 연산자나 속성이 있을 수 있습니다.
- 예를 들어, opset 18에서 사용되는 특정 연산자나 속성이 opset 9에서는 다른 방식으로 정의되었거나 아예 존재하지 않을 수 있습니다.
- 연산자 호환성
- opset 버전이 낮을수록 ONNX 모델에서 사용되는 연산자와 속성들이 더 단순하고 호환성이 높습니다. 이는 다양한 프레임워크와 도구에서 더 잘 지원된다는 의미입니다.
- opset 9은 opset 18보다 오래된 버전이기 때문에, 더 많은 프레임워크와 도구들이 안정적으로 지원하고 있을 가능성이 높습니다.
- 새로운 기능 및 변경 사항
- 높은 opset 버전은 새로운 기능과 연산자를 포함하지만, 이는 때로는 더 복잡하고 최신 프레임워크 및 도구만이 지원할 수 있습니다.
- opset 9에서는 비교적 기본적이고 보편적으로 사용되는 연산자들이 포함되어 있어, 다양한 환경에서의 호환성이 보장됩니다.
항상 ‘최신버전이 좋은 것은 아니다’라고 생각하는 나에게 이런 호감적인 답변을 준다.
카메라 스위치와 객체 감지를 위한 공유 카메라 객체 수정
리눅스에서 웹캠 변경 및 안드로이드에서 전면/후면 카메라 변경을 가능하게 하는 CameraSwitcher.cs 스크립트를 전 포스팅에서 작성했었고 이어서 객체 감지 관련 스크립트를 작성할 것이다. 그 전에 앞서 WebCamTexture를 공용으로 사용하게 되므로 해당 객체를 위한 스크립트를 분리한다.
Assets>Scripts내에SharedWebCam.cs스크립트를 생성한다.- 다음과 같이 작성
using System.Collections;
using System.Collections.Generic;
using UnityEngine;

public class SharedWebCam : MonoBehaviour
{
    public static WebCamTexture webCamTexture;

    void Awake()
    {
        if (webCamTexture == null)
        {
            WebCamDevice[] devices = WebCamTexture.devices;
            if (devices.Length > 0)
            {
                webCamTexture = new WebCamTexture(devices[0].name);
                webCamTexture.Play();
            }
            else
            {
                Debug.LogError("No camera devices found.");
            }
        }
    }
}
- 유니티 에디터에서
Hierarchy창에서 마우스 우클릭하여Create Empty로 빈 게임 오브젝트를 만들고 이름을SharedWebcam으로 변경해준다. - 해당 오브젝트 클릭 후
Add Component를 눌러 작성해준 Shared Web Cam 스크립트를 찾아 연결한다. - 기본적으로 해당 오브젝트의 활성화 시
Awake()메소드 내에 선언된 웹캠 텍스쳐 관련 코드로 카메라를 실행시킨다.
그리고 기존 카메라 사용하던 소스에 대한 부분을 별도의 스크립트로 분리하였으니 기존에 카메라 전환을 위해 사용하던 CameraSwitcher.cs 스크립트도 수정해준다.
CameraSwitcher.cs (펼치기/접기)
using System.Collections;
using System.Collections.Generic;
using UnityEngine;
using UnityEngine.UI;

public class CameraSwitcher : MonoBehaviour
{
    public RawImage rawImage;
    public AspectRatioFitter aspectRatioFitter;
    public Button switchCameraButton;

    private int currentCameraIndex = 0;

    // Start is called before the first frame update
    void Start()
    {
        rawImage.texture = SharedWebCam.webCamTexture;

        switchCameraButton.onClick.AddListener(SwitchCamera);

        #if UNITY_ANDROID
        rawImage.rectTransform.localEulerAngles = new Vector3(0, 0, -90);
        #else
        rawImage.rectTransform.localScale = new Vector3(-1, 1, 1);
        #endif
    }

    void SwitchCamera()
    {
        WebCamDevice[] devices = WebCamTexture.devices;
        if (devices.Length > 0)
        {
            currentCameraIndex = (currentCameraIndex + 1) % devices.Length;
            SharedWebCam.webCamTexture.Stop();
            SharedWebCam.webCamTexture.deviceName = devices[currentCameraIndex].name;
            SharedWebCam.webCamTexture.Play();

            // 전면 카메라일 경우 텍스처를 좌우로 뒤집기 (안드로이드용)
            #if UNITY_ANDROID
            if (devices[currentCameraIndex].isFrontFacing)
            {
                rawImage.rectTransform.localScale = new Vector3(-1, 1, 1);
            }
            else
            {
                rawImage.rectTransform.localScale = new Vector3(1, 1, 1);
            }
            // 카메라 피드를 세로 모드에 맞게 회전 (안드로이드용)
            rawImage.rectTransform.localEulerAngles = new Vector3(0, 0, -90);
            #else
                // 다른 플랫폼 (리눅스 등)에서는 기본 설정 유지
            #endif
        }
    }

    // Update is called once per frame
    void Update()
    {
        if (SharedWebCam.webCamTexture != null)
        {
            // 화면이 세로 모드에 맞게 Aspect Ratio 조정
            float aspectRatio = (float)SharedWebCam.webCamTexture.width / (float)SharedWebCam.webCamTexture.height;
            aspectRatioFitter.aspectRatio = aspectRatio;
        }
    }
}
객체감지 구현
지금부터 스크립트를 기준으로 필요한 기본 셋팅 및 전처리, 추론, 후처리 등의 내용을 설명한다. 해당과정까지의 삽질은 상당히 깊었으나 잘 다듬어진 결과를 공유한다.
Assets>Scripts에서ObjectDetection.cs스크립트를 생성한다.Hierarchy에서 빈 게임 오브젝트(Create Empty)를 생성하고 이름을ObjectDetectionController로 변경한다.- 해당 오브젝트에서
Add Component를 활용하여 방금 만든ObjectDetection을 검색하여 연결- 스크립트 작성 후 연결할 변수들이 꽤 있으므로 마지막에 다시 언급한다.
클래스 변수 정의 및 바운딩 박스 클래스 정의
ObjectDetection 클래스가 가지는 클래스 변수 부분이다. 아직 다른 클래스에서 참조할 수준의 변수는 없으니 전부 private으로 선언해주었다.
using System;
using System.Diagnostics;
using System.Collections.Generic;
using UnityEngine;
using Unity.Barracuda;
using UnityEngine.UI;

public class ObjectDetection : MonoBehaviour
{
    public NNModel modelAsset;
    public RawImage rawImage;
    public AspectRatioFitter aspectRatioFitter;
    public GameObject boundingBoxPrefab;  // 바운딩 박스를 그리기 위한 Image 프리팹
    public RectTransform boundingBoxContainer; // 바운딩 박스를 그릴 부모 컨테이너
    public List<int> targetClasses = new List<int>();  // 필터링할 클래스 인덱스 리스트

    private IWorker worker;
    private Texture2D tempTexture;
    private Texture2D resizedTexture = null;
    private Texture2D finalTexture = null;

    // Confidence threshold
    private const float confidenceThreshold = 0.5f;
    // IoU threshold for NMS
    private const float iouThreshold = 0.5f;

    // 원본 해상도 저장 변수
    private int originalWidth;
    private int originalHeight;

    private List<GameObject> boundingBoxes = new List<GameObject>();
}


public class BoundingBox
{
    public float x1, y1, x2, y2, score;
    public int classIndex;

    public BoundingBox(float x1, float y1, float x2, float y2, float score, int classIndex)
    {
        this.x1 = x1;
        this.y1 = y1;
        this.x2 = x2;
        this.y2 = y2;
        this.score = score;
        this.classIndex = classIndex;
    }
}
NNModel타입은onnx파일과 연결되는 딥러닝 모델이다.- 이미지 전처리 및 후처리를 위한 변수들이 선언되어있다.
- 본인의 삽질 과정에서 특히
Texture2D의 생성자new가Update()안에 들어가있어 Memory Leak을 겪었어서 심히 머리가 아팠다. 일부 텍스쳐를 1회만 초기화 해주기위해null값을 우선 넣었다. - 스코어 기반 바운딩박스 필터링과 IoU 기반 NMS 후처리를 위한 임계값이 정의 및 선언 되어있다.
BoundingBox클래스를 통해 해당 구조의 바운딩 박스를 추론 이후부터 처리 및 가공한다.
Start 및 Update
앞으로 나오는 모든 메소드는 전부 ObjectDetection 클래스의 메소드이다.
public class ObjectDetection : MonoBehaviour
{
    ...

    void Start()
    {
        // WebCamTexture 공유
        rawImage.texture = SharedWebCam.webCamTexture;
        tempTexture = new Texture2D(SharedWebCam.webCamTexture.width, SharedWebCam.webCamTexture.height);

        // Barracuda 모델 로드
        var model = ModelLoader.Load(modelAsset);

        // GPU 기반 워커 사용
        worker = WorkerFactory.CreateWorker(WorkerFactory.Type.ComputePrecompiled, model);
    }

    // Update is called once per frame
    void Update()
    {
        if (SharedWebCam.webCamTexture.didUpdateThisFrame)
        {
            Stopwatch preprocessStopwatch = new Stopwatch();
            Stopwatch inferenceStopwatch = new Stopwatch();
            Stopwatch postprocessStopwatch = new Stopwatch();


            // 웹캠 텍스처를 텐서로 변환
            preprocessStopwatch.Start();
            Tensor input = PreprocessImage(SharedWebCam.webCamTexture);
            preprocessStopwatch.Stop();


            // 모델 실행
            inferenceStopwatch.Start();
            worker.Execute(input);
            // 결과 가져오기
            Tensor output = worker.PeekOutput();
            inferenceStopwatch.Stop();

            // 결과 처리 (예: 객체 감지 바운딩 박스 그리기)
            postprocessStopwatch.Start();
            ProcessOutput(output);
            postprocessStopwatch.Stop();


            // 디버그 로그 출력
            UnityEngine.Debug.Log($"Preprocess time: {preprocessStopwatch.ElapsedMilliseconds} ms, " +
                                  $"Inference time: {inferenceStopwatch.ElapsedMilliseconds} ms, " +
                                  $"Postprocess time: {postprocessStopwatch.ElapsedMilliseconds} ms");

            input.Dispose();
            output.Dispose();
        }
    }

    void OnDestroy()
    {
        // 자원 정리
        worker.Dispose();
    }
}
Start()
- 해당 메소드에선 포스팅 상단에서 작성한
webCamTexture를 연결한다. tempTexture변수는 딥러닝 추론 과정의 이미지 전처리 시 사용된다. 해상도를 가져오려는 카메라의 해상도로 초기화 해준다.- onnx 모델을 로드하고 해당 모델을 사용하는 워커를 생성한다.
CreateWorker의 생성자에 넣을 적절한 아규먼트를 알기위해 Barracuda 공식 문서를 읽어보면 좋다. 포스팅 최하단에 첨부한다.
Update()
- 구조는 단순하다. 각 전처리, 추론, 후처리가 가지는 소요시간을 체크하기 위해
Stopwatch클래스를 사용한 부분이 있고 이는Debug.Log를 통해 로그에 기록된다. - 전처리 목적의
PreprocessImage, 추론과정의Execute,PeekOutput, 후처리를 위한ProcessOutput메소드가 사용된다. - 텐서의 릴리즈를 위한
Dispose가input과output에 각각 호출된다. PeekOutput은 단일 출력이라면PeekOutput()과 같이 사용하면 되고, 여러 출력이 존재한다면 이름을 제공하여 원하는 텐서를 가져올 수 있다.PeekOutput(output_1_name)
onDestroy()
- 소멸자 호출 시 실행되는 부분이다.
YOLO의 전처리 구현
Update()에서 사용되는 YOLOv8을 위한 전처리는 결국 PreprocessImage 함수고 해당 함수는 Tensor 타입으로 리턴한다. 여기서도 기존의 파이썬으로 구현되어있던 전처리와 일치시키기 위한 많은 삽질이 있었다.
    Tensor PreprocessImage(WebCamTexture texture)
    {
        int inputWidth = 640;
        int inputHeight = 640;
        int inputChannel = 3;

        // // 원본 해상도 저장
        originalWidth = texture.width;
        originalHeight = texture.height;

        // // 텍스처에서 색상 데이터를 읽어와서 크기를 조정하고 정규화
        Color32[] pixels = texture.GetPixels32();
        tempTexture.SetPixels32(pixels);
        tempTexture.Apply();

        Texture2D processedTexture = LetterBox(tempTexture, inputWidth, inputHeight);

        // Texture2D를 Tensor로 변환
        Tensor inputTensor = new Tensor(processedTexture, inputChannel);
        return inputTensor;
    }

    Texture2D LetterBox(Texture2D source, int newWidth, int newHeight)
    {
        float aspectRatio = (float)source.width / source.height;
        int resizeWidth, resizeHeight;
        if (source.width > source.height)
        {
            resizeWidth = newWidth;
            resizeHeight = Mathf.RoundToInt(newWidth / aspectRatio);
        }
        else
        {
            resizeHeight = newHeight;
            resizeWidth = Mathf.RoundToInt(newHeight * aspectRatio);
        }

        RenderTexture rt = RenderTexture.GetTemporary(resizeWidth, resizeHeight);
        Graphics.Blit(source, rt);
        RenderTexture previous = RenderTexture.active;
        RenderTexture.active = rt;
        if (resizedTexture == null) {
            resizedTexture = new Texture2D(resizeWidth, resizeHeight);
        }
        // Texture2D resizedTexture = new Texture2D(resizeWidth, resizeHeight);
        resizedTexture.ReadPixels(new Rect(0, 0, resizeWidth, resizeHeight), 0, 0);
        resizedTexture.Apply();
        RenderTexture.active = previous;
        RenderTexture.ReleaseTemporary(rt);

        if (finalTexture == null)
        {
            finalTexture = new Texture2D(newWidth, newHeight);
        }
        // Texture2D finalTexture = new Texture2D(newWidth, newHeight);
        Color32[] fillPixels = finalTexture.GetPixels32();
        for (int i = 0; i < fillPixels.Length; i++)
        {
            fillPixels[i] = new Color32(128, 128, 128, 255); // 패딩 색상 (회색)
        }
        finalTexture.SetPixels32(fillPixels);
        finalTexture.Apply();

        int offsetX = (newWidth - resizeWidth) / 2;
        int offsetY = (newHeight - resizeHeight) / 2;
        Graphics.CopyTexture(resizedTexture, 0, 0, 0, 0, resizeWidth, resizeHeight, finalTexture, 0, 0, offsetX, offsetY);
        finalTexture.Apply();

        return finalTexture;
    }
- 전처리 함수
PreprocessImage는 카메라 텍스쳐로부터 다른tempTexture에 데이터를 복사하고, 이를 가지고 실제YOLO에서 사용하는LetterBox전처리 함수를 실행한다. 이는 또 다른Texture2D를 리턴하며 이를 기반으로 입력Tensor를 생성해 리턴한다. - 기존 GPT-4o가 제공해준 스크립트에는
PreprocessImage함수 내에서tempTexture를 계속new키워드로 생성했는데 이는 메모리 누수의 원인이 되어 클래스 변수로 분리하였다. Tensor클래스에 대한 생성자는 shape을 입력한 뒤 데이터를 넣어줄 수도 있고, 위 스크립트와 같이Texture2D를 받고 채널 수를 받을 수도 있다. 다양한 생성자가 있으니 문서 하단 텐서 조작에 관한 공식 문서를 참고하자.LetterBox함수의 내용은 명확하다: 입력 이미지의 너비와 높이 중 큰 쪽을 기준으로 640px에 맞게 리사이즈 한다. 이때 종횡비를 유지한다. 이후 너비와 높이 중 짧은 쪽에 패딩을 추가하여 총 크기가 640x640이 되도록 가공한다. 이때 패딩은 중앙 정렬되도록 추가한다.- 이 때,
LetterBox내에 있는RenderTexture변수도 처음에new로 생성되어 있었기에 스크립트 실행시 GPU 메모리가 누수되는 원인 중 하나였다. 현재 스크립트에선 누수 문제는 없다. - 파이썬에서는 이미지를
numpy모듈로 가공 시 (0-255)의unit8데이터 타입인데, 유니티에서GetPixels32로 가져올 시 이미 (0-1) 정규화가 되어있다. 그래서 굳이 255.0으로 나눌 필요가 없었다.
모델 추론
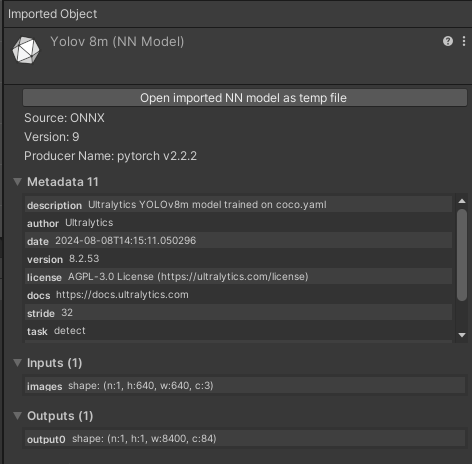
모델 추론 코드는 Update()안에 명시된 Execute와 출력을 가져오는 Peekoutput이 전부다. 유니티 에디터에서 onnx 모델을 살펴보면 입력 및 출력 형태를 확인할 수 있다. 이를 잘 파악하고 있자.
후처리 구현
기본적으로 본인의 후처리는 시각화 부분도 포함된다. 하지만 구분은 명확하다. 후처리하여 시각화하지 않고 디버그 로그에만 출력하고 싶다면 그렇게 할 수 있도록 코드를 구분하여 작성해놓았다.
후처리 함수: ProcessOutput()
    void ProcessOutput(Tensor output)
    {
        // 기존 바운딩 박스 제거
        foreach (var box in boundingBoxes)
        {
            Destroy(box);
        }
        boundingBoxes.Clear();

        // Tensor 데이터를 배열로 변환
        float[] outputArray = output.ToReadOnlyArray();

        // 텐서의 배치 크기, 앵커 수, 출력 차원을 가져옴
        int batch = output.shape.batch;   // 1
        int anchor = output.shape.width;  // 8400
        int outputDim = output.shape.channels;  // 84

        List<BoundingBox> boxes = new List<BoundingBox>();

        // 유효한 경계상자 추출
        for (int a = 0; a < anchor; a++)
        {
            int offset = a * outputDim;
            float x = outputArray[offset];
            float y = outputArray[offset + 1];
            float w = outputArray[offset + 2];
            float h = outputArray[offset + 3];
            float[] scores = new float[80];
            System.Array.Copy(outputArray, offset + 4, scores, 0, 80);

            // 최대 스코어 및 클래스 인덱스 찾기
            float maxScore = 0;
            int classIndex = -1;
            for (int i = 0; i < scores.Length; i++)
            {
                if (scores[i] > maxScore)
                {
                    maxScore = scores[i];
                    classIndex = i;
                }
            }

            // 최대 스코어가 컨피던스 임계값을 넘는지 확인하고, 지정한 클래스만 유효한 경계상자로 추가
            if (maxScore > confidenceThreshold && targetClasses.Contains(classIndex))
            {
                // 바운딩 박스 좌표 변환 (xywh -> xyxy)
                float x1 = x - w / 2;
                float y1 = y - h / 2;
                float x2 = x + w / 2;
                float y2 = y + h / 2;

                // 유효한 경계상자 저장
                boxes.Add(new BoundingBox(x1, y1, x2, y2, maxScore, classIndex));
            }
        }

        // NMS 적용
        List<BoundingBox> finalBoxes = ApplyNMS(boxes, iouThreshold);

        // 바운딩 박스들을 원본 해상도로 스케일링
        ScaleBoxes(finalBoxes, originalHeight, originalWidth, 640, 640);

        // 최종 경계상자 출력 및 시각화
        foreach (var box in finalBoxes)
        {
            UnityEngine.Debug.Log($"Final bounding box: ({box.x1}, {box.y1}, {box.x2}, {box.y2}) with class {box.classIndex} and score {box.score}");
            DrawBoundingBox(box);
        }
    }
- 전 프레임에서 남아있는 바운딩 박스가 있다면 우선 정리한다.
- 해당 YOLOv8 모델의 출력 형태는
(1, 8400, 84)이다. 이는 COCO 클래스에 대한 예측 및 앵커박스의 조합으로 구성되어있고 이를float[]배열로 가져온다. - 앵커를 하나씩 돌며 바운딩 박스의 $(x, y, w, h)$ 좌표를 추출한다. 그리고 84개 중 남은 80개가 80개 클래스에 대한 scores이다.
- 하나의 앵커 당 가장 높은 클래스 스코어와 인덱스를 추출하고, 해당 스코어가 우리가 설정한 임계값을 만족하는지, 그리고 우리가 추출하고자 하는 관심 클래스 목록에 있는 인덱스인지 확인한다.
- 그 후 해당된다면 해당 박스의 좌표계를 좌상단, 우하단의 $(x1, y1, x2, y2)$로 변경하고 박스 리스트에 추가한다.
- 한 프레임의 출력으로 부터 위 필터링 과정을 우선 거쳤다면 살아남은 박스들끼리 NMS를 적용하여 IoU를 기반으로 겹치는 박스를 제거해준다.
- 이 후 최종 박스들에 대해서 전처리 이전의 원본 해상도에 대한 박스 좌표로 최종 변경해주는
ScaleBoxes후처리를 거치면 원본 해상도에 맞는 유효한 바운딩 박스가 도출된다.
아래는 후처리에 사용된 함수들 스크립트이다. ApplyNMS, IoU, ClipBoxes, ScaleBoxes 4개의 함수로 구성되어 있다.
    List<BoundingBox> ApplyNMS(List<BoundingBox> boxes, float iouThreshold)
    {
        List<BoundingBox> finalBoxes = new List<BoundingBox>();

        // 클래스별로 나누기
        Dictionary<int, List<BoundingBox>> boxesByClass = new Dictionary<int, List<BoundingBox>>();
        foreach (var box in boxes)
        {
            if (!boxesByClass.ContainsKey(box.classIndex))
            {
                boxesByClass[box.classIndex] = new List<BoundingBox>();
            }
            boxesByClass[box.classIndex].Add(box);
        }

        // 클래스별로 NMS 적용
        foreach (var pair in boxesByClass)
        {
            List<BoundingBox> classBoxes = pair.Value;

            // 스코어 순으로 정렬
            classBoxes.Sort((a, b) => b.score.CompareTo(a.score));

            while (classBoxes.Count > 0)
            {
                BoundingBox bestBox = classBoxes[0];
                finalBoxes.Add(bestBox);
                classBoxes.RemoveAt(0);

                // IoU 계산하여 겹치는 박스 제거
                classBoxes.RemoveAll(box => IoU(bestBox, box) > iouThreshold);
            }
        }

        return finalBoxes;
    }

    float IoU(BoundingBox a, BoundingBox b)
    {
        float intersectionX1 = Mathf.Max(a.x1, b.x1);
        float intersectionY1 = Mathf.Max(a.y1, b.y1);
        float intersectionX2 = Mathf.Min(a.x2, b.x2);
        float intersectionY2 = Mathf.Min(a.y2, b.y2);

        float intersectionArea = Mathf.Max(0, intersectionX2 - intersectionX1) * Mathf.Max(0, intersectionY2 - intersectionY1);

        float aArea = (a.x2 - a.x1) * (a.y2 - a.y1);
        float bArea = (b.x2 - b.x1) * (b.y2 - b.y1);

        float unionArea = aArea + bArea - intersectionArea;

        return intersectionArea / unionArea;
    }

    void ClipBoxes(List<BoundingBox> boxes, int height, int width)
    {
        foreach (var box in boxes)
        {
            box.x1 = Mathf.Clamp(box.x1, 0, width);
            box.y1 = Mathf.Clamp(box.y1, 0, height);
            box.x2 = Mathf.Clamp(box.x2, 0, width);
            box.y2 = Mathf.Clamp(box.y2, 0, height);
        }
    }

    void ScaleBoxes(List<BoundingBox> boxes, int originalHeight, int originalWidth, int targetHeight, int targetWidth, bool padding = true, bool xywh = false)
    {
        float gain = Math.Min((float)targetHeight / originalHeight, (float)targetWidth / originalWidth);
        float padWidth = (targetWidth - originalWidth * gain) / 2;
        float padHeight = (targetHeight - originalHeight * gain) / 2;

        foreach (var box in boxes)
        {
            if (padding)
            {
                box.x1 = (box.x1 - padWidth) / gain;
                box.y1 = (box.y1 - padHeight) / gain;
                box.x2 = (box.x2 - padWidth) / gain;
                box.y2 = (box.y2 - padHeight) / gain;
            }
            else
            {
                box.x1 /= gain;
                box.y1 /= gain;
                box.x2 /= gain;
                box.y2 /= gain;
            }

            // 바운딩 박스를 이미지 경계 내로 클립
            ClipBoxes(boxes, originalHeight, originalWidth);
        }
    }
시각화 구현
시각화는 바운딩 박스를 어떻게 표시할 것인 가에 대한 부분이므로 코드는 간단하지만 유니티 에디터에서 설정해줄 부분이 조금 있다.
void DrawBoundingBox(BoundingBox box)
    {
        // 바운딩 박스 Image 생성
        GameObject boundingBox = Instantiate(boundingBoxPrefab, boundingBoxContainer);
        RectTransform rectTransform = boundingBox.GetComponent<RectTransform>();

        // 바운딩 박스 위치와 크기 설정 (y 좌표 변환: 유니티의 좌표계에서 원점은 좌측 하단)
        float anchorMinX = box.x1 / originalWidth;
        float anchorMinY = 1 - (box.y2 / originalHeight);  // y2는 우하단의 y좌표, 좌표계 변환 필요
        float anchorMaxX = box.x2 / originalWidth;
        float anchorMaxY = 1 - (box.y1 / originalHeight);  // y1은 좌상단의 y좌표, 좌표계 변환 필요

        rectTransform.anchorMin = new Vector2(anchorMinX, anchorMinY);
        rectTransform.anchorMax = new Vector2(anchorMaxX, anchorMaxY);
        rectTransform.offsetMin = Vector2.zero;
        rectTransform.offsetMax = Vector2.zero;

        boundingBoxes.Add(boundingBox);
    }
- 여기서 적잖이 당황했던 부분은 파이썬에선 좌표계가 좌상단이 (0,0)인데 유니티에선 좌하단이 (0,0)이다. 변환해줘야한다. 처음에 박스가 이상하게 그려지는 것을 보고 매우 당황했다.
유니티 에디터에서 오브젝트 연결
- 바운딩 박스 프리팹 생성
Hierarchy에서UI->Image를 생성합니다.- 이
Image객체를 프로젝트Assets폴더로 드래그하여 프리팹으로 만듭니다. - 이 프리팹의 이름을
BoundingBoxPrefab으로 변경합니다. - 프리팹
BoundingBoxPrefab을 선택하고Inspector에서 Image 컴포넌트의 색상을 투명하지 않은 색상(예: 빨간색, 투명도 조정)으로 설정합니다. - 필요하면 RectTransform의 기본 크기를 설정합니다 (예: Width와 Height를 100으로 설정).
Hierarchy창에 있는ObjectDetectionController오브젝트를 클릭하고 우측Inspector에서 컴포넌트 변수들을 연결한다.- Model Asset에는
onnx파일을 연결한다. - Raw Image와 Bounding Box Container는
RawImage오브젝트를 연결한다. - Aspect Ratio Fitter는
RawImage의 컴포넌트를 연결한다(기존과 동일) - Bounding Box Prefab은 위에서 만들어준 바운딩 박스 프리팹 오브젝트를 연결한다.
- Model Asset에는
실행 확인
다음과 같이 투명도가 있는 빨간색으로 바운딩 박스를 표시하였다.

실행 결과 문제점들이 몇가지 보인다.
- 우선 후처리 속도가 너무 느리다. 디버그 로그를 통해 확인결과 전처리 및 추론이 빠르다 생각되었는데 후처리에서 100ms 넘는 시간을 소모하여 실시간 추론이라는 말이 무색해진다.
- 본인은 바운딩 박스의 표시를 윤곽선만 표시하고 싶었다(파이썬의 그것 처럼). 그러나 유니티라는 게임 엔진 속에서 그 것이 쉽지는 않았다.
그리고 기존 삽질 및 문제를 해결하다보니 작년부로 Barracuda 가 아닌 유니티 Sentis 라는 프레임워크가 출시되었다고 한다. 기존 유니티 Barracuda가 지원해주지 못한 AI 관련 기술들을 해당 프레임워크에서 끝장을 보려고 하나보다. 공부할 것이 늘었다.
ultralytics - yolov8
Unity - Barracuda: IWorker
Unity - Barracuda: TensorHandling

댓글남기기